Making a 3 hole washer toss game is a fun and rewarding DIY project that’s perfect for backyard barbecues, tailgates, and family gatherings. Whether you’re looking for a simple weekend project or a more elaborate custom game, this guide will walk you through everything you need to know about How To Make A 3 Hole Washer Toss Game.
Choosing Your Materials for Washer Toss
The beauty of building your own washer toss game is that you can customize it to your liking. Here are the basic materials you’ll need:
- Wood: Plywood is a popular choice due to its affordability and durability. You’ll need enough for two 1’ x 2’ boards. Consider using thicker plywood for added sturdiness. Other options include solid wood like pine or cedar for a more premium feel.
- Washers: You’ll need a total of six washers, three for each team. Choose washers that are roughly 2.5 inches in diameter and have a good weight to them. You can find these at most hardware stores.
- Cups/Pipes: Three cups or pipes per board are needed for the targets. PVC pipes cut to about 4 inches are a common choice, but you could also use metal cans, buckets, or even plastic cups.
- Measuring Tools: A tape measure, ruler, and pencil are essential for marking and cutting your wood accurately.
- Saw: A jigsaw or circular saw is needed for cutting the plywood.
- Drill: Use a drill for creating the holes for the cups/pipes.
- Screws/Nails: You’ll need these to attach the cups/pipes to the boards.
- Paint/Stain/Sealer (Optional): Add a personal touch and protect your game from the elements with paint, stain, or a sealant.
 Essential Materials for Building a Washer Toss Game
Building the Washer Toss Boards
Building the boards is a straightforward process. Follow these steps:
- Cut the Plywood: Cut two identical pieces of plywood to your desired dimensions (typically 1 foot by 2 feet).
- Mark the Cup/Pipe Locations: Divide the board into three sections, marking the center of each section where you’ll place the cups/pipes.
- Cut Holes for Cups/Pipes: Using a hole saw attachment for your drill, cut holes slightly larger than the diameter of your cups/pipes in the marked locations.
- Attach the Cups/Pipes: Insert the cups/pipes into the holes and secure them from underneath using screws or nails.
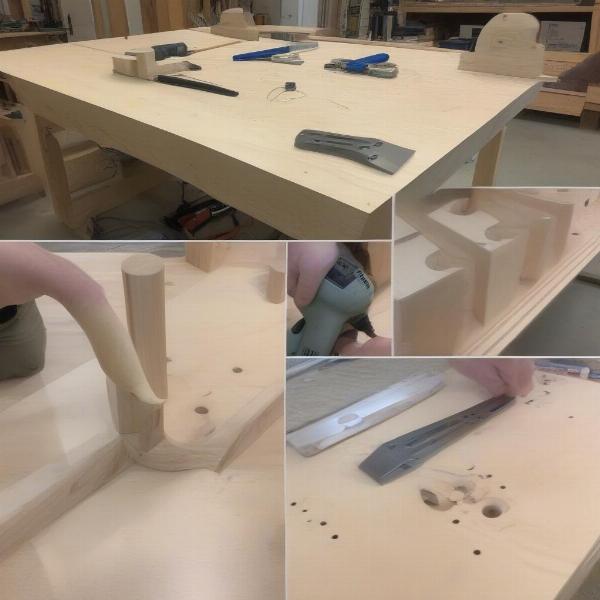 Step-by-Step Washer Toss Board Construction
Setting Up the Game
Once you’ve built your boards, setting up the game is simple:
- Position the Boards: Place the boards a specified distance apart (typically 10-20 feet). You can adjust the distance based on the skill level of the players.
- Assign Teams and Washers: Divide into two teams and assign each team a set of three washers.
- Gameplay: Players take turns tossing their washers at the opposite board, aiming to land them in the cups/pipes.
Scoring the Game
Scoring can be customized, but a common scoring system is as follows:
- 3 points: Washer lands in the furthest cup/pipe.
- 1 point: Washer lands in the middle cup/pipe.
- 0 points: Washer lands on the board or misses completely.
- Cancellation: If both teams have a washer in the same cup/pipe, the points cancel each other out.
Variations and Customizations
Here are some ideas to add your own flair:
- Themed Designs: Paint your boards with your favorite sports team logos or other designs.
- Built-in Scorekeepers: Add a small chalkboard or whiteboard to each board for keeping score.
- Carrying Handles: Attach handles to the sides of the boards for easy transport.
- Foldable Legs: Create foldable legs to elevate the boards and make them more stable.
Advanced Techniques for Building a Washer Toss Game
Want to take your game to the next level? Consider these more advanced techniques:
- Angled Boards: Create angled boards for a more challenging game.
- Target Lighting: Add LED lights to the targets for nighttime play.
- Electronic Scorekeeping: Implement an electronic scoring system using sensors and a display.
FAQ: Building Your Own 3-Hole Washer Toss Game
Q: Can I use different materials for the cups?
A: Yes, you can use metal cans, buckets, or even plastic cups.
Q: What is the standard distance between the boards?
A: Typically, the distance is between 10 and 20 feet.
Q: How do I make the game more challenging?
A: Increase the distance between the boards or use smaller cups.
Q: Can I play with more than two teams?
A: Yes, you can adapt the rules to accommodate more teams.
Q: Where can I find washers for the game?
A: Hardware stores are a good place to find washers.
Q: What type of wood is best for the boards?
A: Plywood is a cost-effective option, but you can use other woods like pine or cedar.
Q: How do I protect the boards from weather damage?
A: Apply a sealant or weatherproof paint to protect the wood.
Conclusion
Building a 3 hole washer toss game is a fun project that can be enjoyed by people of all ages. With a little creativity and effort, you can create a unique and personalized game that will provide hours of entertainment. So gather your materials, follow the steps outlined in this guide, and get ready to toss! Remember to customize your game to make it truly your own. Happy tossing!